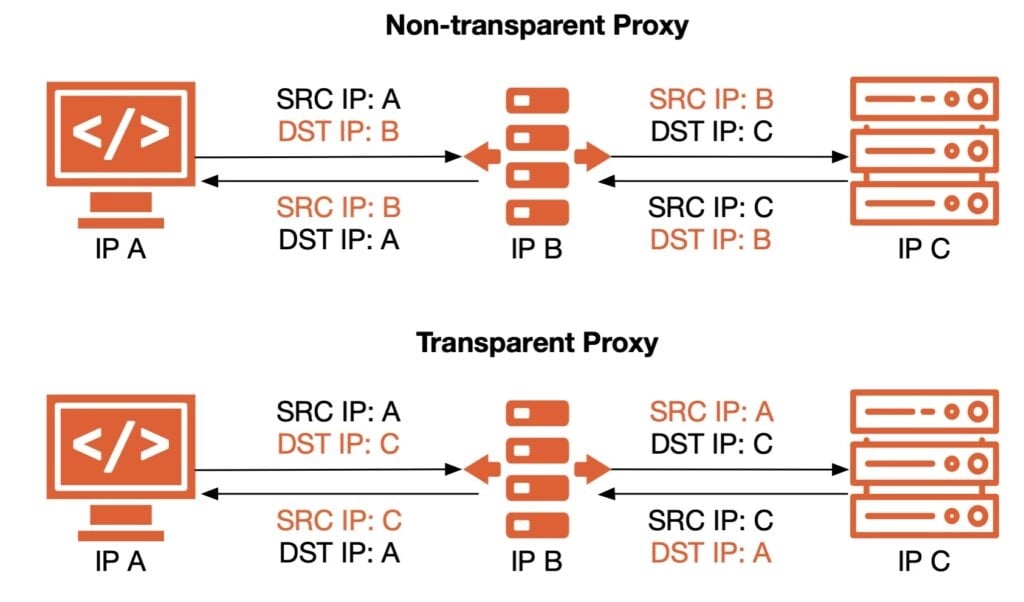
A transparent proxy (TProxy) allows you to intercept and redirect network traffic without requiring any configuration on the client devices. This is particularly useful for monitoring, filtering, or caching traffic in network. In countries with strict internet regulations, a proxy is usually needed to access foreign websites. The traditional way is to configure the proxy on each device, but this is cumbersome and not user-friendly. A transparent proxy can solve this problem by redirecting all traffic through the proxy server without requiring any configuration on the client devices.
I setup a transparent proxy for my home network recently, this post documents the process. The setup is based on my home network environment, so it may not be suitable for everyone. But the general process should be similar.
Environment
- Router: Running OpenWrt. Will be performed as the main router.
- As the main router for the home network.
- LAN IP: 192.168.31.1
- Home Server: A headless Linux server. Currently running Ubuntu 24.04. Will be performed as the sideway router.
- Acts as the transparent proxy server.
- LAN IP: 192.168.31.241 (via DHCP static lease)
- Network: All devices in the home network are connected to the router.
Process Overview
We need to set the Home Server as the default gateway and DNS server for devices that require proxying. The general steps are:
- Configure the router Through DHCP, set the Home Server as the default gateway and DNS server for devices that require proxying.
- Configure the Home Server Set up TProxy to intercept and redirect traffic.
- Enable IP forwarding.
- Configure iptables to hijack the traffic to tproxy server.
- Configure the proxy server to handle the traffic.
The real setup process is reversed, since you don’t want to lose internet access while setting up. So you actually need to setup the proxy server first, verify it works, then hijack traffics to it.
Setup the proxy server
I use mihomo(whoever came up with this name must be a genius) as the transparent proxy server. The setup step could be found on its wiki. The configure process is straightforward, just follow the instructions. The important part is to enable TProxy mode, and set the listening ports. What I setup is:
- Tproxy server: Listening on port 7894.
- DNS server: Listening on port 5353. running on fake-ip mode. It will return a fake-ip(using preserved IP) for domains that need to be proxied, and return the real IP for other domains. The proxy server will handle the traffic based on the IP.
Hijack traffic
We need to hijack the traffic from local network to public network, and redirect it to the proxy server.
- Enable IP forwarding
sysctl -w net.ipv4.ip_forward=1
- Configure iptables
# Create a new chain for tproxy
iptables -t mangle -N TPROXY_CHAIN

# Exclude broadcast traffic
iptables -t mangle -A TPROXY_CHAIN -d 224.0.0.0/3 -j RETURN
# Exclude traffic from the proxy server itself - Some multicast traffic may be sent to the proxy server, we don't want to hijack it.
iptables -t mangle -A TPROXY_CHAIN -s 192.168.31.241 -j RETURN

# Mark TCP/UCP traffic and redirect it to TPROXY port
iptables -t mangle -A TPROXY_CHAIN -p tcp -j TPROXY --on-port 7894 --tproxy-mark 1
iptables -t mangle -A TPROXY_CHAIN -p udp -j TPROXY --on-port 7894 --tproxy-mark 1

# Apply the TPROXY_CHAIN after PREROUTING
iptables -t mangle -A PREROUTING -s 192.168.0.0/16 ! -d 192.168.0.0/16 -j TPROXY_CHAIN

# Redirect DNS traffic to port 5353
iptables -t nat -A PREROUTING -p udp --dport 53 -j REDIRECT --to-ports 5353
iptables -t nat -A PREROUTING -p tcp --dport 53 -j REDIRECT --to-ports 5353
- Setup IP rule and routing
# Add a local route for TPROXY
ip route add local 0.0.0.0/0 dev lo table 100

# For packets marked with TPROXY mark 1, route them to the local table
ip rule add fwmark 1 lookup 100
After these steps, you should be able to access the internet through the proxy server. Manually set the DNS server and default gateway of your device to the proxy server’s IP, and check if it works.
Setup DHCP on the router
Now we can configure the router to automatically set the DNS server and default gateway for devices in the home network. Depending on your router, the steps may vary. But the general idea is to set the DHCP options to make sure the devices will use the proxy server as the default gateway and DNS server.
Problem
- IPv6: As you can see, the setup only works for IPv4. The setup requires the proxy server to be set as the default gateway for devices that require proxying, while the main router is still the default gateway for other devices. This can be done via DHCP, and should work for DHCPv6. However, Android devices do not support DHCPv6(see here), they only support SLAAC. This means that it’s impossible to set a different default gateway for IPv6 on Android devices, since SLAAC uses Router Advertisement(RA) to set the default gateway, which is always the same in a network. We can not even manually set a different IPv6 gateway on Android devices!
- Solution: I can prevent the router from sending IPv6 DNS in RA by disabling “Announce DNS servers” in OpenWrt. This way, Android devices will not use IPv6 DNS, and will fallback to IPv4 DNS, which is set by DHCP. Then I can wipe out AAAA records returned from the DNS server, so that devices will only use IPv4 for proxied domains. This is not a perfect solution, but it works for me since I don’t use IPv6 much, and devices that don’t require proxying can still use IPv6.
- Solution B: Throw away your Android devices🤣